
Master hidden and starting values in Profile Perfect with examples from levels 51, 52, 54, 55, 58, and 83, so you solve later grids faster without guessing.


Guide By Liam Stone
Published on June 10, 2026
Liam Stone has played Profile Perfect since the app first launched on the Apple App Store. He spotted its potential early, and that early bet turned into hundreds of hours spent solving levels, testing clue logic, and documenting answers for other players. Liam runs the YouTube channel Puzzle Game Answer where his puzzle walkthroughs have earned over 935,000 views and a growing community of more than 800 subscribers. He covers a wide range of mobile puzzle games beyond Profile Perfect, giving him firsthand experience with how these games design clues, structure levels, and trip up even experienced players. Every guide on this site reflects that hands on experience. Liam plays each level himself, verifies every answer against the in game grid, and rewrites confusing clues into plain language so you don't need to guess. If you want more of his walkthroughs, subscribe to his channel.
Loading calendar...
At some point, Profile Perfect stops feeling like a cute little logic-grid warmup and starts acting like a real puzzle game. Not brutal, not unfair, but definitely crunchier. The big jump happens when levels begin hiding useful starting information in plain sight.
I don’t mean “hidden” as in random. Profile Perfect is still a logic game, and the satisfying loop is the same: read clues, place safe checkmarks, eliminate bad options, and let the grid shrink. But in later levels, the board often gives you quiet setup values before the clue chain really starts. These values might appear as starting answers, visual facts, or clue results that behave like anchors. If you ignore them, the level feels floaty. If you use them properly, the whole puzzle suddenly snaps into place.
That is the core technique: before solving clues, solve the starting state.
In Profile Perfect, every level has subjects and traits. Subjects are the columns: museums, people, paintings, artifacts, tickets, chemicals, or whatever the level is about. Traits are the rows: location, name, frame, salary, color, temperature, flask type, and so on.
Early levels usually hand you direct clues like “Dog B is Domino.” Later levels add a twist. Some values are already functionally known before you solve the normal clue list. These are what I call hidden values or starting anchors.
They matter because Profile Perfect uses mutual exclusion. If one subject has a value, the other subjects usually cannot have that same value in that same trait row. So one quiet anchor can remove several options before you even touch the juicy clues.
That’s the banger move: don’t treat hidden values as flavor. Treat them as free eliminations.
Here’s the method I use when a later Profile Perfect level starts looking messy.
First, scan for starting anchors. These are values the level gives you immediately or values strongly shown by the setup. Don’t rush into relative clues like “between,” “next to,” or “furthest from” yet.
Second, mark every safe consequence. If Museum B is already tied to Space, then Space cannot belong to Museum A, C, or D. If Ticket A is already Evening, then the other tickets are not Evening. This sounds basic, but it’s the difference between a clean solve and a tanked run.
Third, read the clue list again with those anchors active. A clue that looked vague often becomes direct once the hidden value is applied. “The person left of the Curator gets thirsty” is annoying until you already know who has the tumbler. Then it becomes a placement clue.
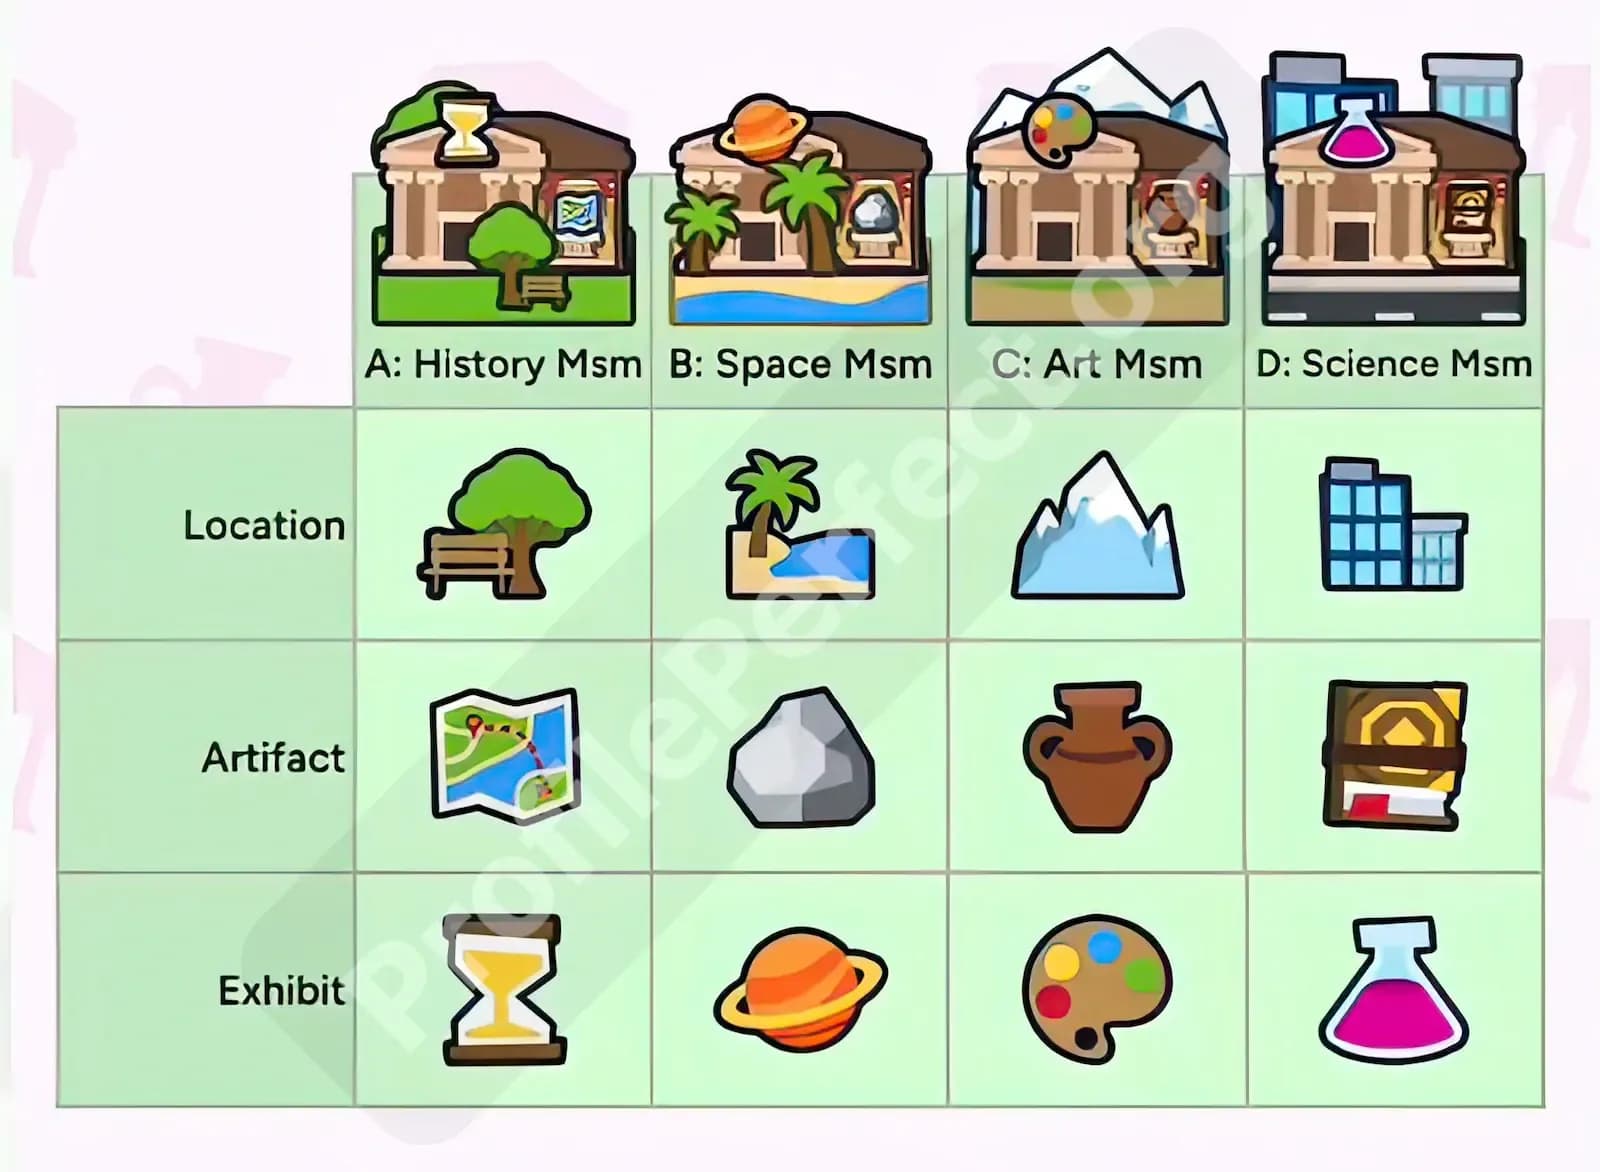
Level 51 is a great first example because the grid looks normal: four museums, with location, artifact, and exhibit traits. But the setup is already doing work.
The key starting anchors are that Museum B is connected to the Space exhibit, Museum B is at the Beach, and Museum D is connected to the Science exhibit. Once you know that, the level is much less open than it first appears.
The clue “Space museum displays a mysterious Rock” now becomes almost free: Museum B has the Rock. The clue about tourists visiting the Space museum after surfing also points back to the Beach connection, confirming that Museum B is not just “some Space museum,” but the beach-side Space museum.
Then Science does the same job on the right side. Since Museum D is Science, the clue about the Science museum’s neighbor being on top of the Mountain points to Museum C as the Mountain museum. From there, the Art museum being between two museums can safely land in the middle, and the City clue pushes Museum D into City.
The lesson: hidden values turn relative clues into direct clues. Without the starting anchors, this level feels like you’re juggling museums. With them, you’re just walking left to right.
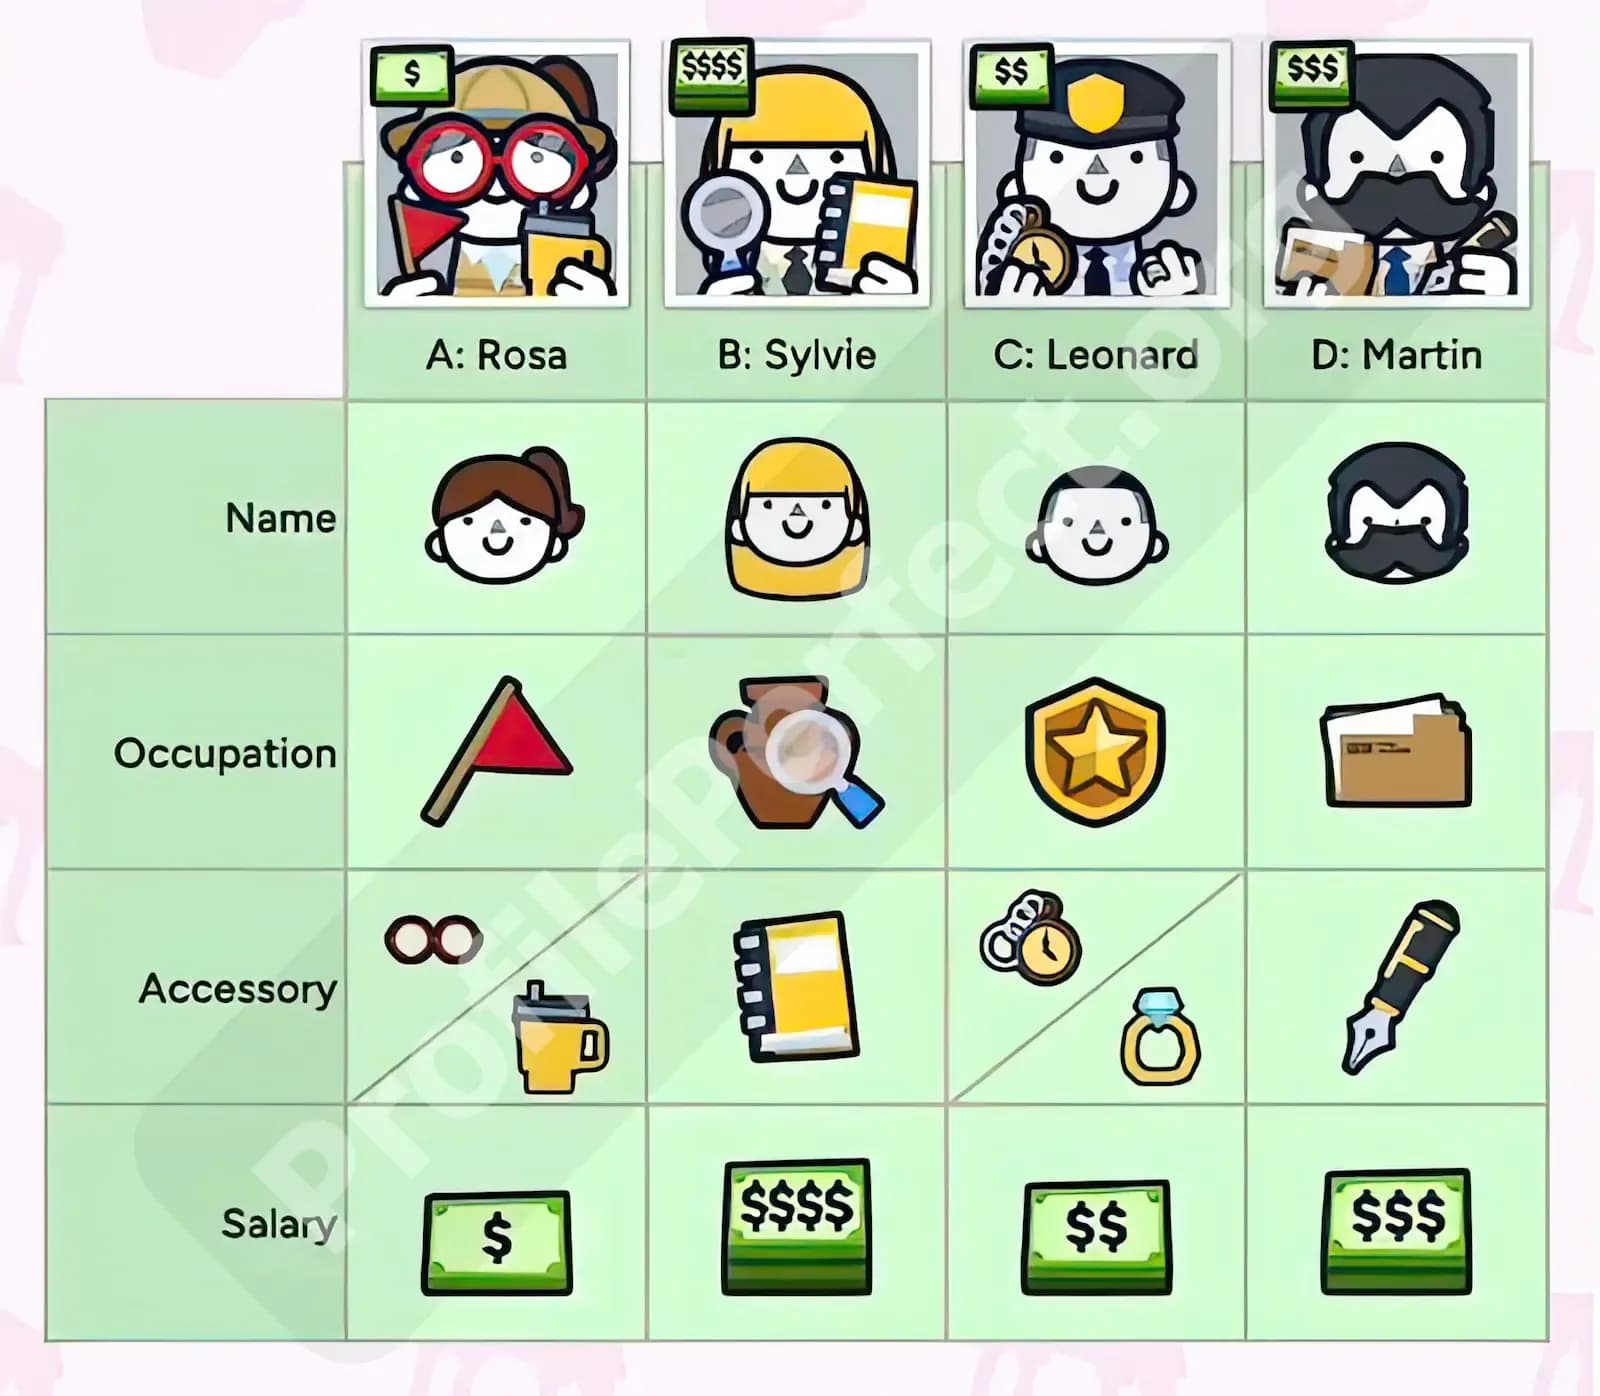
Level 52 is where Profile Perfect gets spicy. You’re matching names, occupations, accessories, and salary. The important starting facts are Person A as the Guide, Person C with the Pocket Watch, and Person A also having a Tumbler.
That Tumbler detail is the hidden-value MVP. The clue says the person on the left of the Curator gets thirsty easily. If “gets thirsty” means Tumbler, and Person A has the Tumbler, then the Curator must be Person B. That is a huge lock.
Now combine that with the clue that the Archivist is furthest from the Guide. Person A is the Guide, so Person D becomes the Archivist. Suddenly the occupation row is almost solved: Person B is Curator, Person D is Archivist, and Person C can become Security.
The Pocket Watch anchor also matters. The clue says the Pocket Watch owner is between the two highest earners. Since Person C owns the Pocket Watch, the two highest salaries must sit around them, which points to Person B and Person D.
This level also teaches an advanced Profile Perfect habit: one cell can carry two values. Person A can have Glasses and a Tumbler. Person C can have a Pocket Watch and a Ring. Don’t assume every cell is single-value when the level clearly supports split answers. That’s how later puzzles quietly nerf lazy solving.
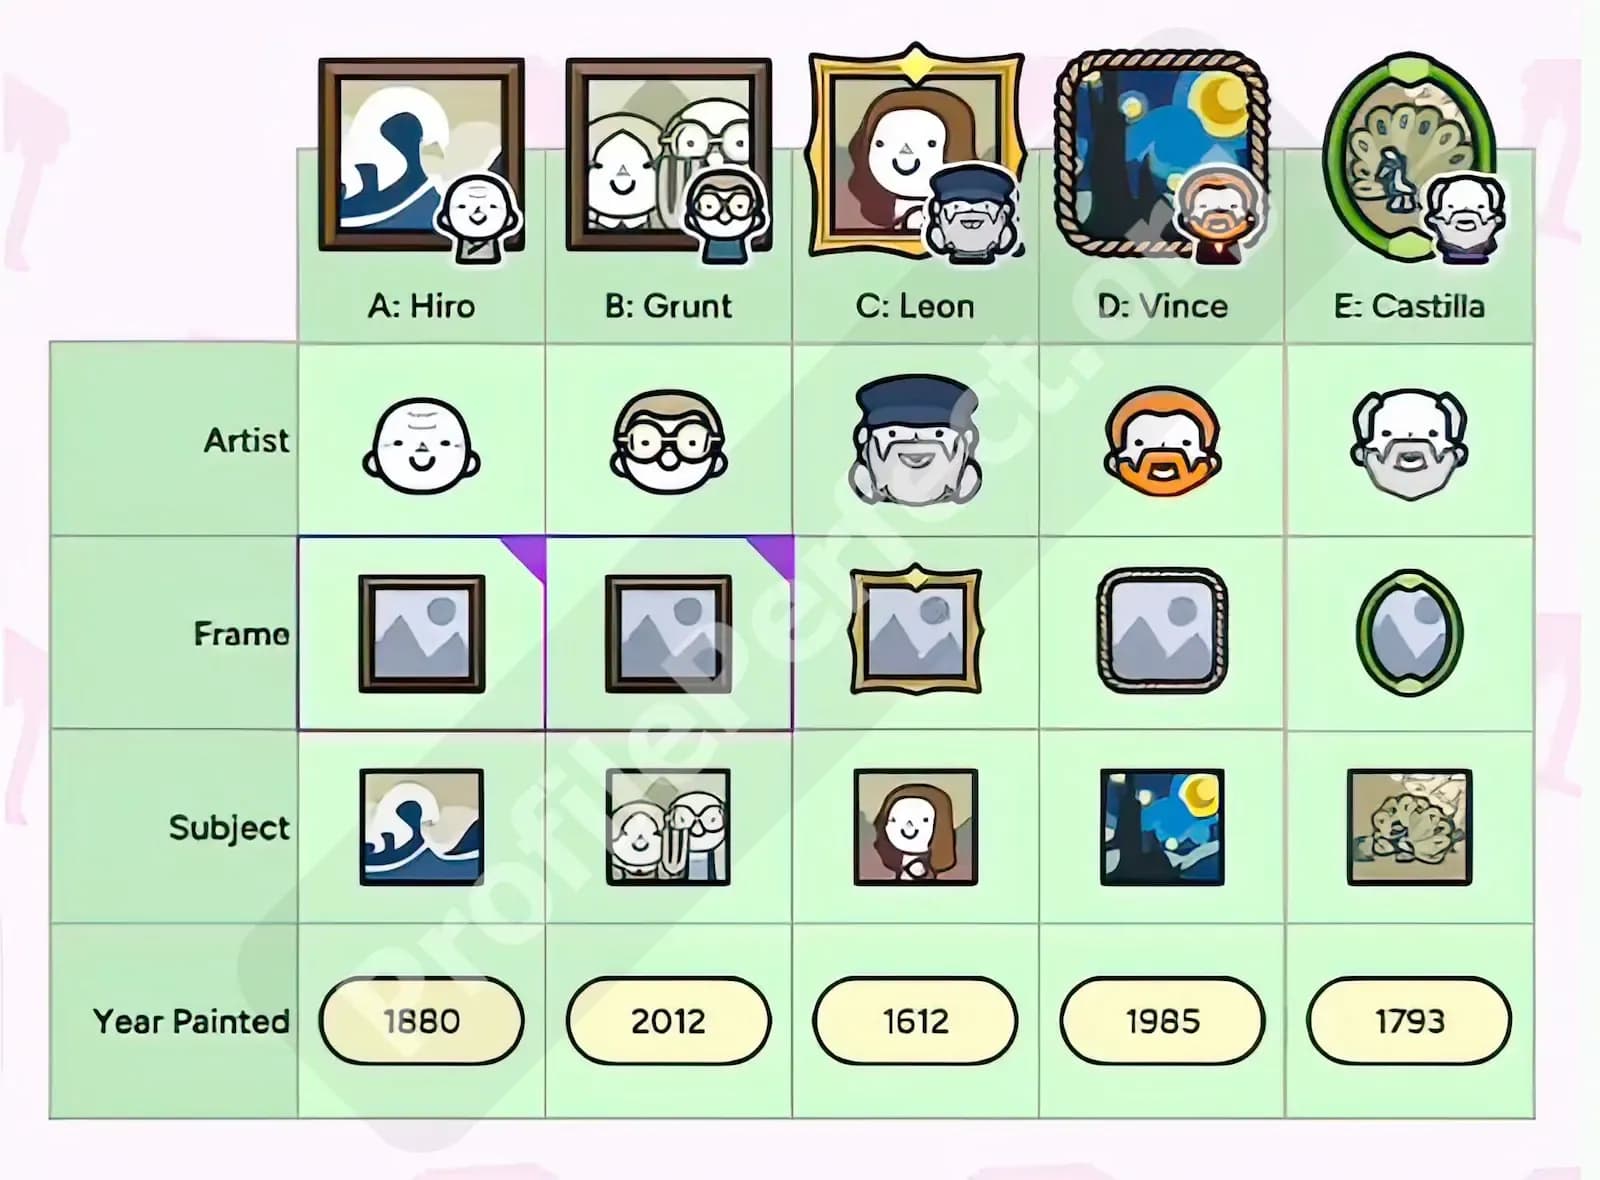
Level 54 is a masterpiece of hidden timeline setup. The big anchors are that Painting E is by Castilla and Painting B was painted in 2012. Painting A by Hiro and Painting D with the Rope Frame are also early locks.
The 2012 value is especially important because of the clue: the Portrait was drawn 400 years before the Couple. Once Painting B is known as 2012, the Portrait must be 1612, and the Couple connects to Painting B. That gives you a clean bridge between subject, year, and subject matter.
Then the level stacks more logic onto it. Painting C is by Leon, and Leon’s drawing is a portrait of a person, so Painting C becomes the 1612 Person Portrait. Paintings with humans in them are next to each other, so the Couple next to the Portrait fits Painting B beside Painting C.
Castilla’s hidden placement also helps eliminate 1985 from Painting E. Since the Peacock painting’s neighbor is the one from 1985, and Painting E ends up as Peacock, Painting D becomes the 1985 Night Sky painting.
The lesson here is simple: years are not decoration. In Profile Perfect, numbers often act like rails. Once the timeline is fixed, the art subjects and frames ride along it.
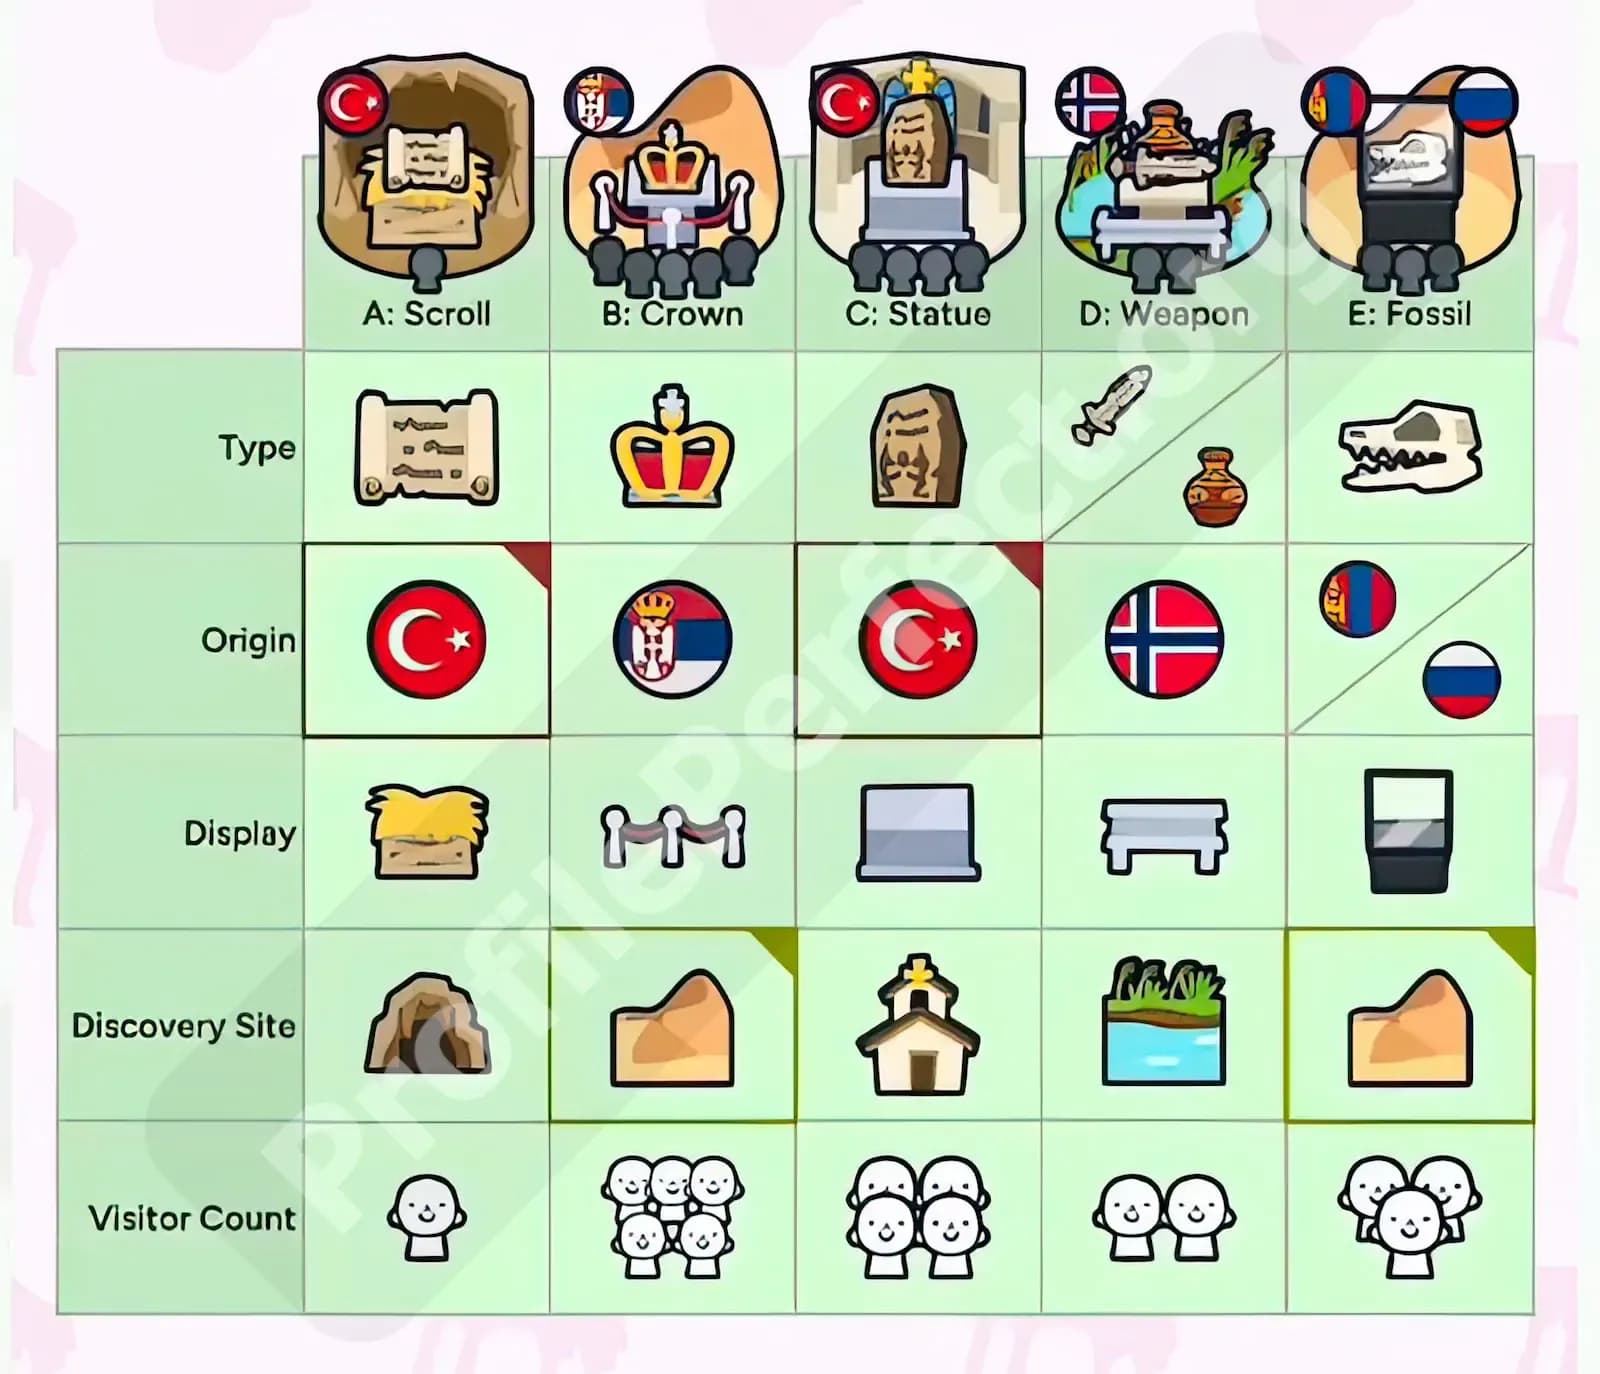
Level 55 looks intimidating because it has five artifacts and five trait rows: type, origin, display, discovery site, and visitor count. This is the kind of level where players start guessing and immediately lose a life. Don’t.
The hidden anchors are Artifact B as the Crown and Artifact D with visitor count x2. Those two details reduce the puzzle fast.
The Crown clue connects to Serbian kings, so Artifact B becomes Serbian. Since Artifact B is also displayed with Stanchion, that column gets very stable early. Meanwhile, Artifact D having x2 matters because the clue says Artifact D is less popular than the one on its right. That makes Artifact E x3, while later clues push Artifact C to x4 and Artifact B to x5.
This level is also loaded with positional logic. The Scroll is found in the Cave. The Statue and Scroll are two columns apart, which places the Statue at Artifact C if the Scroll is Artifact A. The Marsh artifact sits next to the Glass Case, and the Glass Case belongs to the Fossil on Artifact E, so Artifact D becomes Marsh.
The hidden value doesn’t solve the level alone. It gives you the first safe pressure point. Once visitor counts start falling into place, the rest of the grid stops being a swamp.
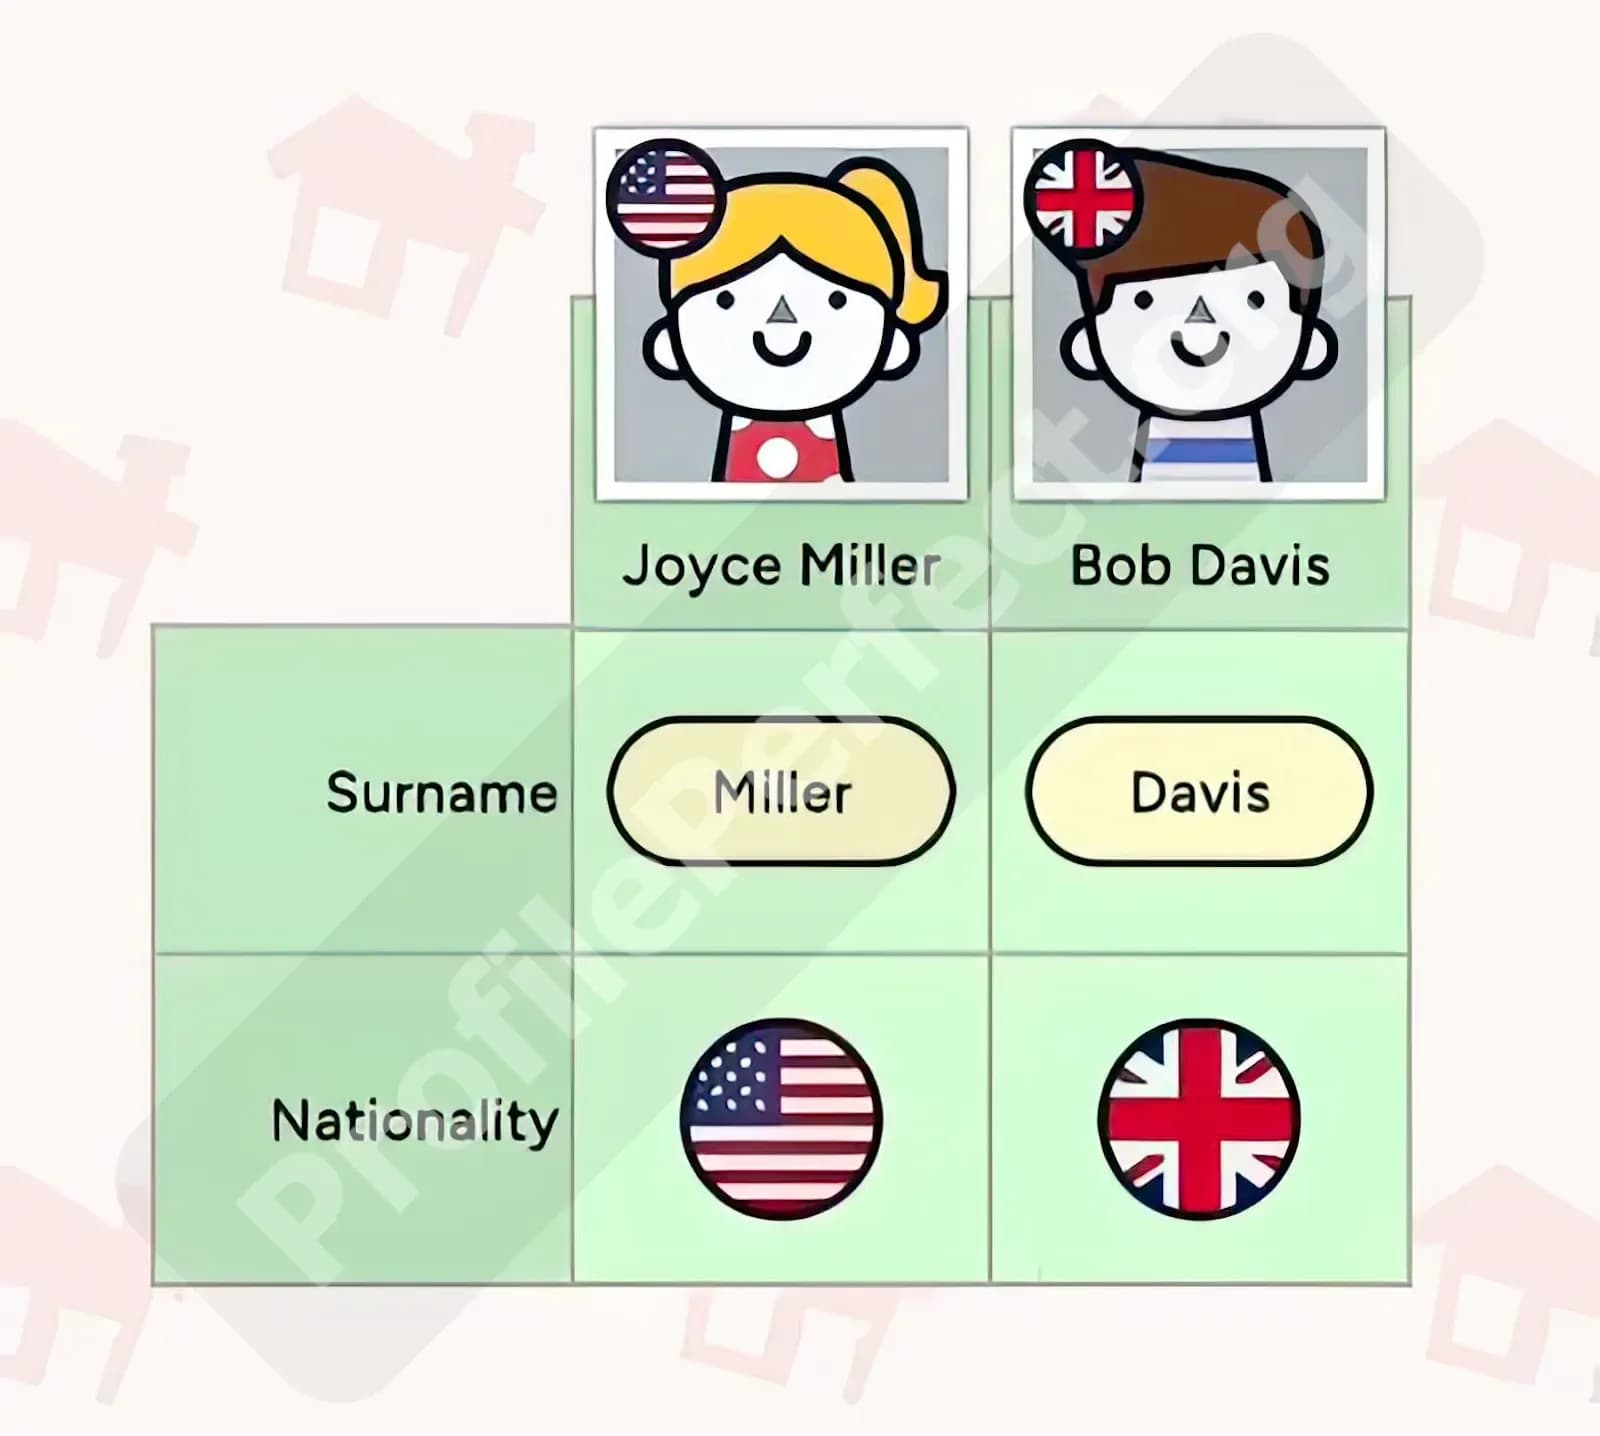
Level 58 is smaller, with only three tickets, but it has a neat trick. The starting anchors are Ticket A in the Evening, Ticket A as Orange, and Ticket C as the Circus ticket.
That Circus anchor makes the clue “The Morning show is on the left of the Circus” immediately useful. If Ticket C is Circus, then Ticket B is the Morning show. But the Concert is held twice a day, and Ticket B is the Concert, so Ticket B can also carry Night. This is another split-value moment.
Ticket A being Orange also locks the final chain: Orange ticket enters Gate B, Evening requires Paper Stub, and Ticket A becomes the Orange Paper Stub for the Movie. Ticket C becomes the Green Coin for the Circus, with a split Gate C / D result depending on the clue chain.
The big takeaway: in smaller grids, hidden values are even stronger. One starting anchor can solve a full row.
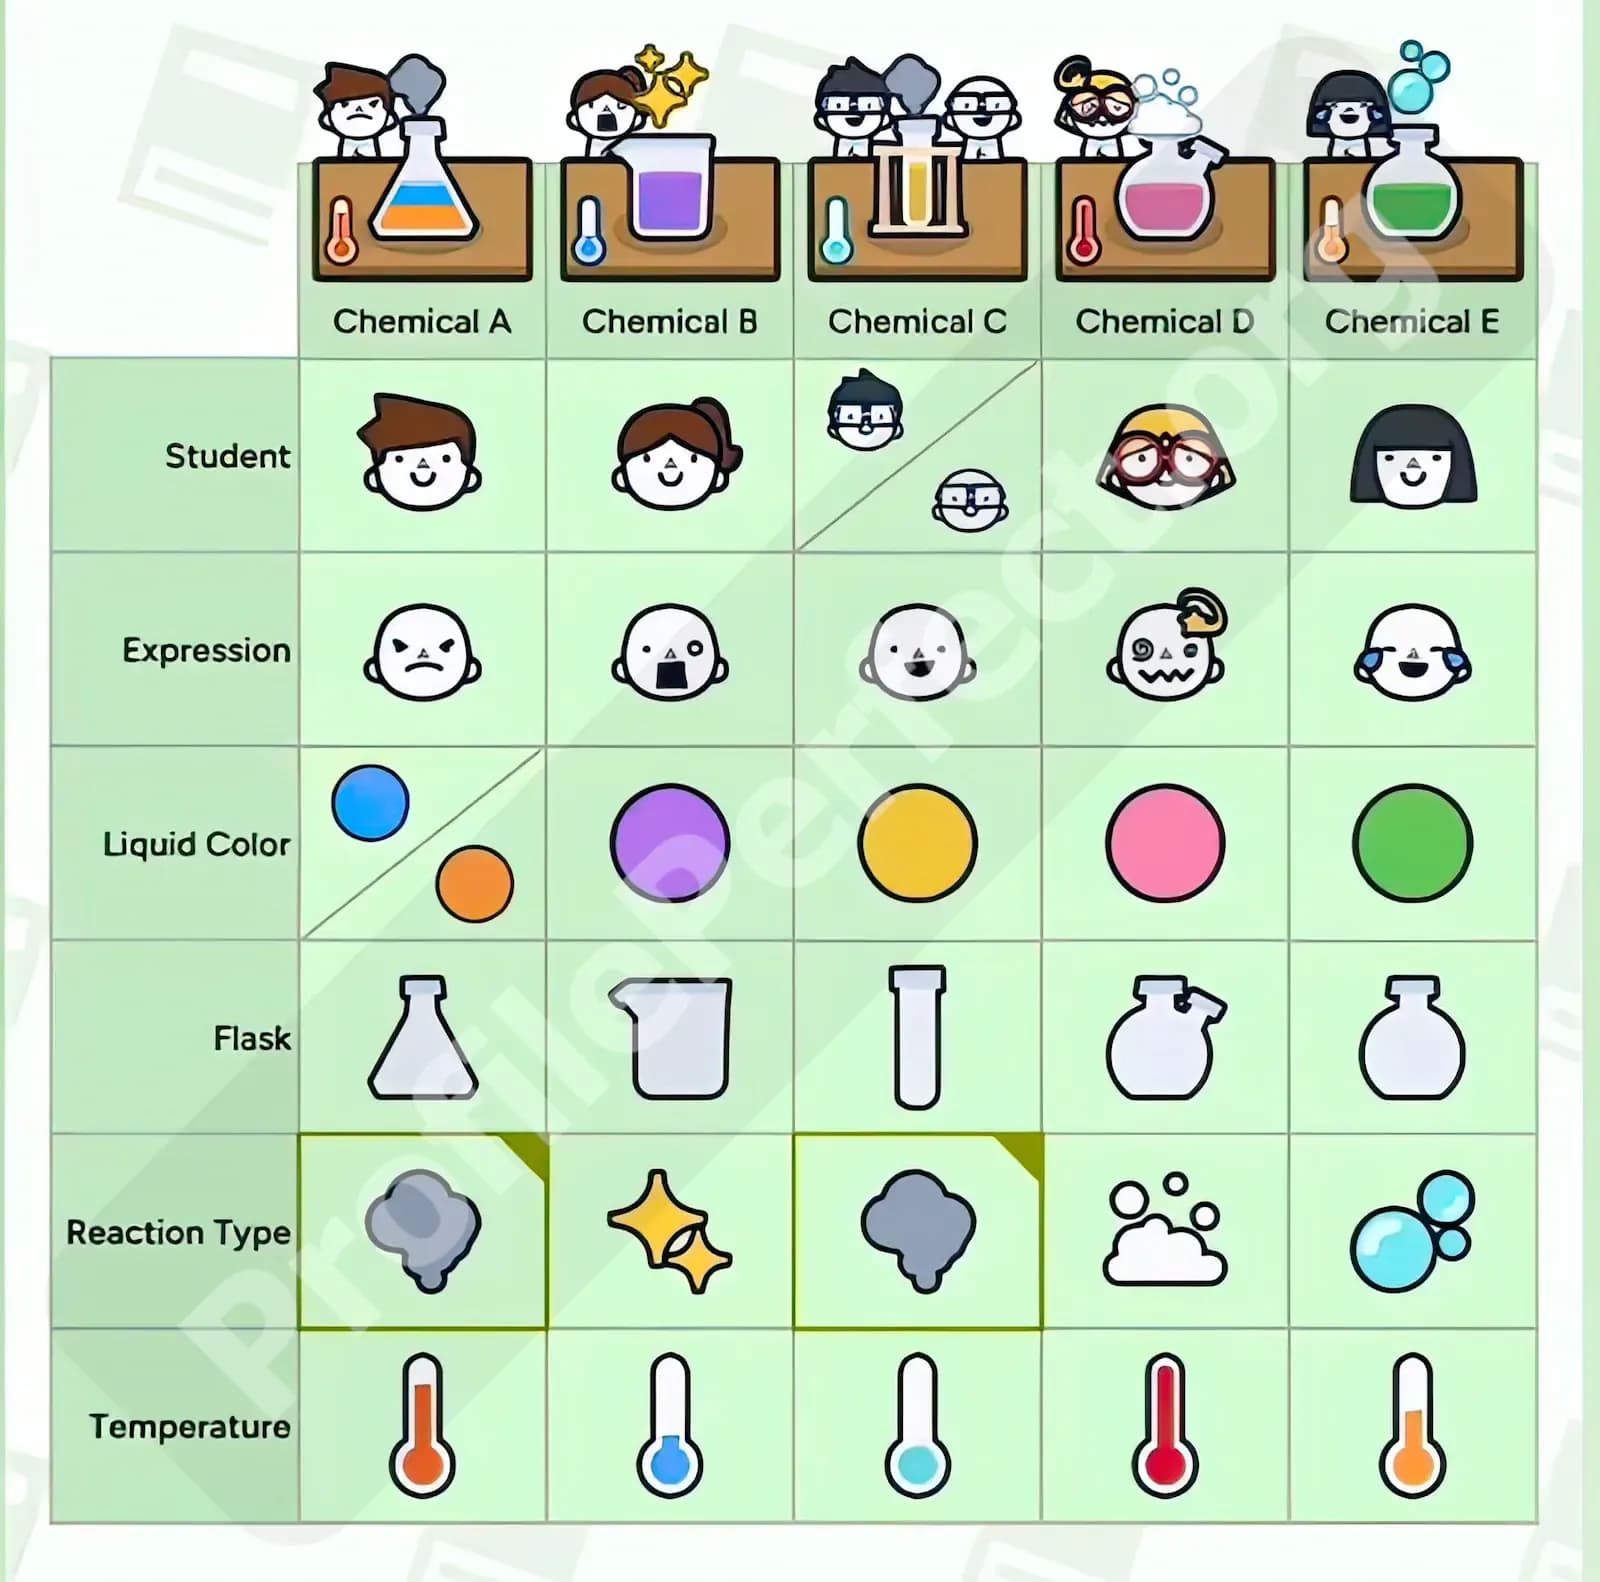
Level 83 is the crunchy one. Five chemicals, six trait rows, and a lot of reactions. The hidden anchors include Chemical D using the Two Neck flask, Chemical D producing Foam, and Chemical C being Very Cold. The level also starts with Chemical A and Chemical C both having Smoke reactions.
This is advanced Profile Perfect because the anchors interact across multiple systems: flask, reaction, temperature, student, expression, and color.
Chemical D’s Two Neck flask leads to Very Hot. Chemical C is Very Cold, and the hottest and coldest chemicals are neighbors, so C and D become a temperature pair. Billy being between Cold and Very Hot places Billy at Chemical C, while Chemical B becomes Cold. Then the clue that the coldest chemical is next to the Glowing one makes Chemical B the Glow reaction.
The Foam anchor also matters because “the two chemicals with bubbling reactions are neighbors” links Chemical D’s Foam with Chemical E’s Bubble. Since Megan works on the Green chemical in the Round flask, Chemical E becomes Megan, Green, Round, and Bubble. That’s a massive column lock.
This is what hidden values do at high levels: they don’t just answer one cell. They start a chain reaction. Fitting, right?
The safest way to solve hard Profile Perfect levels is to build a pre-clue checklist.
Write down the subjects first. Then list any starting values you can see or infer safely. Mark split values clearly, like “Morning / Night” or “Blue / Orange.” After that, use the row-reduction loop: every confirmed value should create eliminations, and every elimination should make the next clue easier.
I was frustrated by hidden-value levels at first because they can feel like the game is withholding information. But once I started treating the opening board as part of the clue list, the vibe changed completely. These levels became less about guessing and more about spotting the quiet anchors before the grid gets noisy.
That’s the real advanced skill in Profile Perfect: don’t wait for the clues to tell you everything. Read the setup, shrink the grid, then solve.